Disk
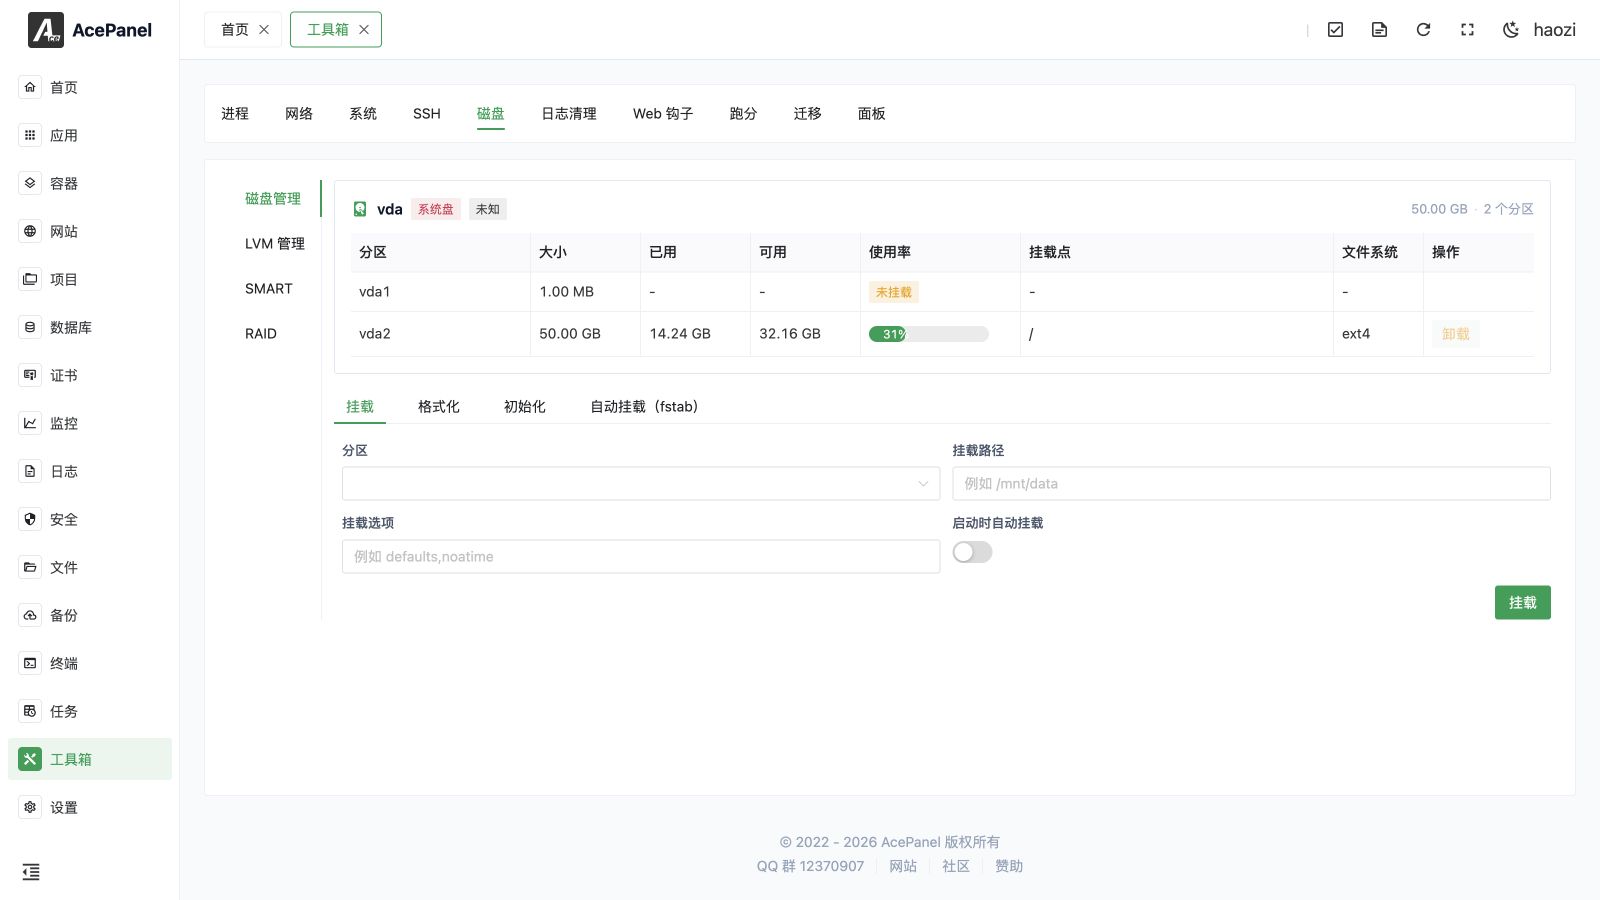
The disk page provides disk partition management, LVM logical volume management, SMART disk health, and RAID array status features.
Disk Management
Disk Information
The top of the page displays basic information for each disk:
- Disk Name: Such as vda, sda
- Disk Type: SSD, or the disk model in uppercase
- Size: Total disk capacity
- Partitions: Number of partitions
The disk that holds the root (/) partition is marked with a System Disk tag and cannot be initialized or have its partitions unmounted.
The system-disk guard prevents common mistakes but does not make every other disk disposable. Identify a device by model, serial number, capacity, partitions, and mount use before a destructive action.
Partition List
Each disk shows its partition information:
| Column | Description |
|---|---|
| Partition Name | Partition device name, such as vda1, vda2 |
| Size | Partition capacity |
| Used | Used space |
| Available | Available space |
| Usage | Usage percentage |
| Mount Point | Mount directory, such as /, /data |
| File System | File system type, such as ext4, xfs |
| Actions | Unmount and other operations |
Mount Partition
Mount an unmounted partition to a specified directory:
- Partition: Select the partition to mount
- Mount Path: Mount directory, such as
/mnt/data - Mount Options: Mount parameters, such as
defaults,noatime - Auto Mount on Boot: Whether to write to fstab for automatic mounting on boot
Format Partition
Warning
Formatting will erase all data on the partition!
- Partition: Select the partition to format
- File System Type: ext4, ext3, xfs, or btrfs
Initialize Disk
Warning
Initialization will delete all partitions and data on the disk!
Initialize the entire disk as a single partition:
- Disk: Select the disk to initialize
- File System Type: ext4, ext3, xfs, or btrfs
After formatting or initialization, verify the partition table, filesystem type, mount point, ownership, free space, and a reboot with the intended fstab entry.
Auto Mount Configuration (fstab)
Display mount configurations in /etc/fstab:
- Device: Device name or UUID
- Mount Point: Mount directory
- File System: File system type
- Options: Mount options
- Actions: Remove configuration
LVM Management
LVM (Logical Volume Manager) provides flexible disk space management with support for dynamic partition resizing.
Physical Volume (PV)
Physical volumes are the foundation of LVM, typically a disk partition or an entire disk.
Create in dependency order: PV → VG → LV → filesystem → mount. Delete in reverse order. A PV in a VG, a VG containing an LV, or an LV that is mounted or in use must be detached from its dependent layer first.
Create Physical Volume:
- Select device (unused partition or disk)
- Click Create Physical Volume
Volume Group (VG)
A volume group consists of one or more physical volumes, representing a storage pool concept.
Create Volume Group:
- Enter volume group name
- Select physical volumes to add
- Click Create Volume Group
Logical Volume (LV)
Logical volumes allocate space from volume groups, equivalent to traditional partitions.
Create Logical Volume:
- Enter logical volume name
- Select volume group
- Set size (GB)
- Click Create Logical Volume
Extend Logical Volume
Dynamically extend the size of a logical volume:
- Select the logical volume to extend
- Enter extension size (GB)
- Check Auto Resize File System (recommended)
- Click Extend Logical Volume
Tip
The advantage of LVM is that logical volumes can be extended online without unmounting partitions or restarting the system.
Auto Resize File System grows a supported filesystem after the LV is extended. If it is disabled or the filesystem is unsupported, the LV can be larger while the mounted filesystem still reports its old size. Verify both the LVM size and df output after expansion.
Destructive disk operations
Formatting, disk initialization, PV/VG/LV removal, and some RAID actions can permanently destroy data. Keep a tested backup and an out-of-band console. A successful dialog only confirms that the command ran; verify the filesystem, mount, data, and boot behavior afterward.
SMART
The SMART tab shows the health information of disks that support S.M.A.R.T.
Tip
SMART relies on smartctl. If it is not installed, the tab will prompt you to install smartmontools first (e.g. apt install smartmontools or dnf install smartmontools).
Select a disk to view its details across two tabs:
- Basic Info: Current temperature, health status (PASSED / FAILED), and device details such as model, serial number, firmware, capacity, interface, rotation rate, and power-on hours.
- SMART Attributes: The full attribute table. For ATA/SATA disks it lists ID, attribute, value, worst, threshold, raw value, and status; for NVMe disks it lists the health information log (such as percentage used, available spare, data units read/written, and media errors).
RAID
The RAID tab automatically detects and displays the status of RAID arrays. The following controller types are supported:
- Linux Software RAID (mdadm)
- MegaRAID (LSI/Broadcom) via
storcli - HP Smart Array via
ssacli - Adaptec via
arcconf
For each array it shows the RAID level, size, strip size, state, the active/total device count, and rebuild progress (when rebuilding), along with the list of physical disks. For hardware controllers, the controller model, serial number, firmware, and cache size are also displayed.
Tip
Detecting hardware RAID requires the corresponding vendor CLI tool to be installed. If no RAID configuration is detected, the tab will indicate so.