PHP Website
PHP websites are used to run PHP programs, such as WordPress, Laravel, ThinkPHP, etc.
Prerequisites
Before creating a PHP website, you need to install:
- Web Server: Nginx, OpenResty, or Apache
- PHP Runtime Environment: Install the required PHP version in Applications > Runtime Environments
Create PHP Website
- Go to the Website page
- Click the PHP tab
- Click Create Website
Configuration Items
- Name: Website identifier, e.g.,
wordpress. Only letters, numbers, hyphens, and underscores are allowed - Domain: Bound domain, e.g.,
blog.example.com - Port: Listening port, default 80
- PHP Version: Select an installed PHP version
- Database: Optionally select an installed database type to create a database, user, and password together with the website
- Directory: Path where website files are stored. If left empty, defaults to the website directory plus
<name>/public - Remarks: Optional remarks
Edit PHP Website
Click the Edit button in the website list to enter the edit page.
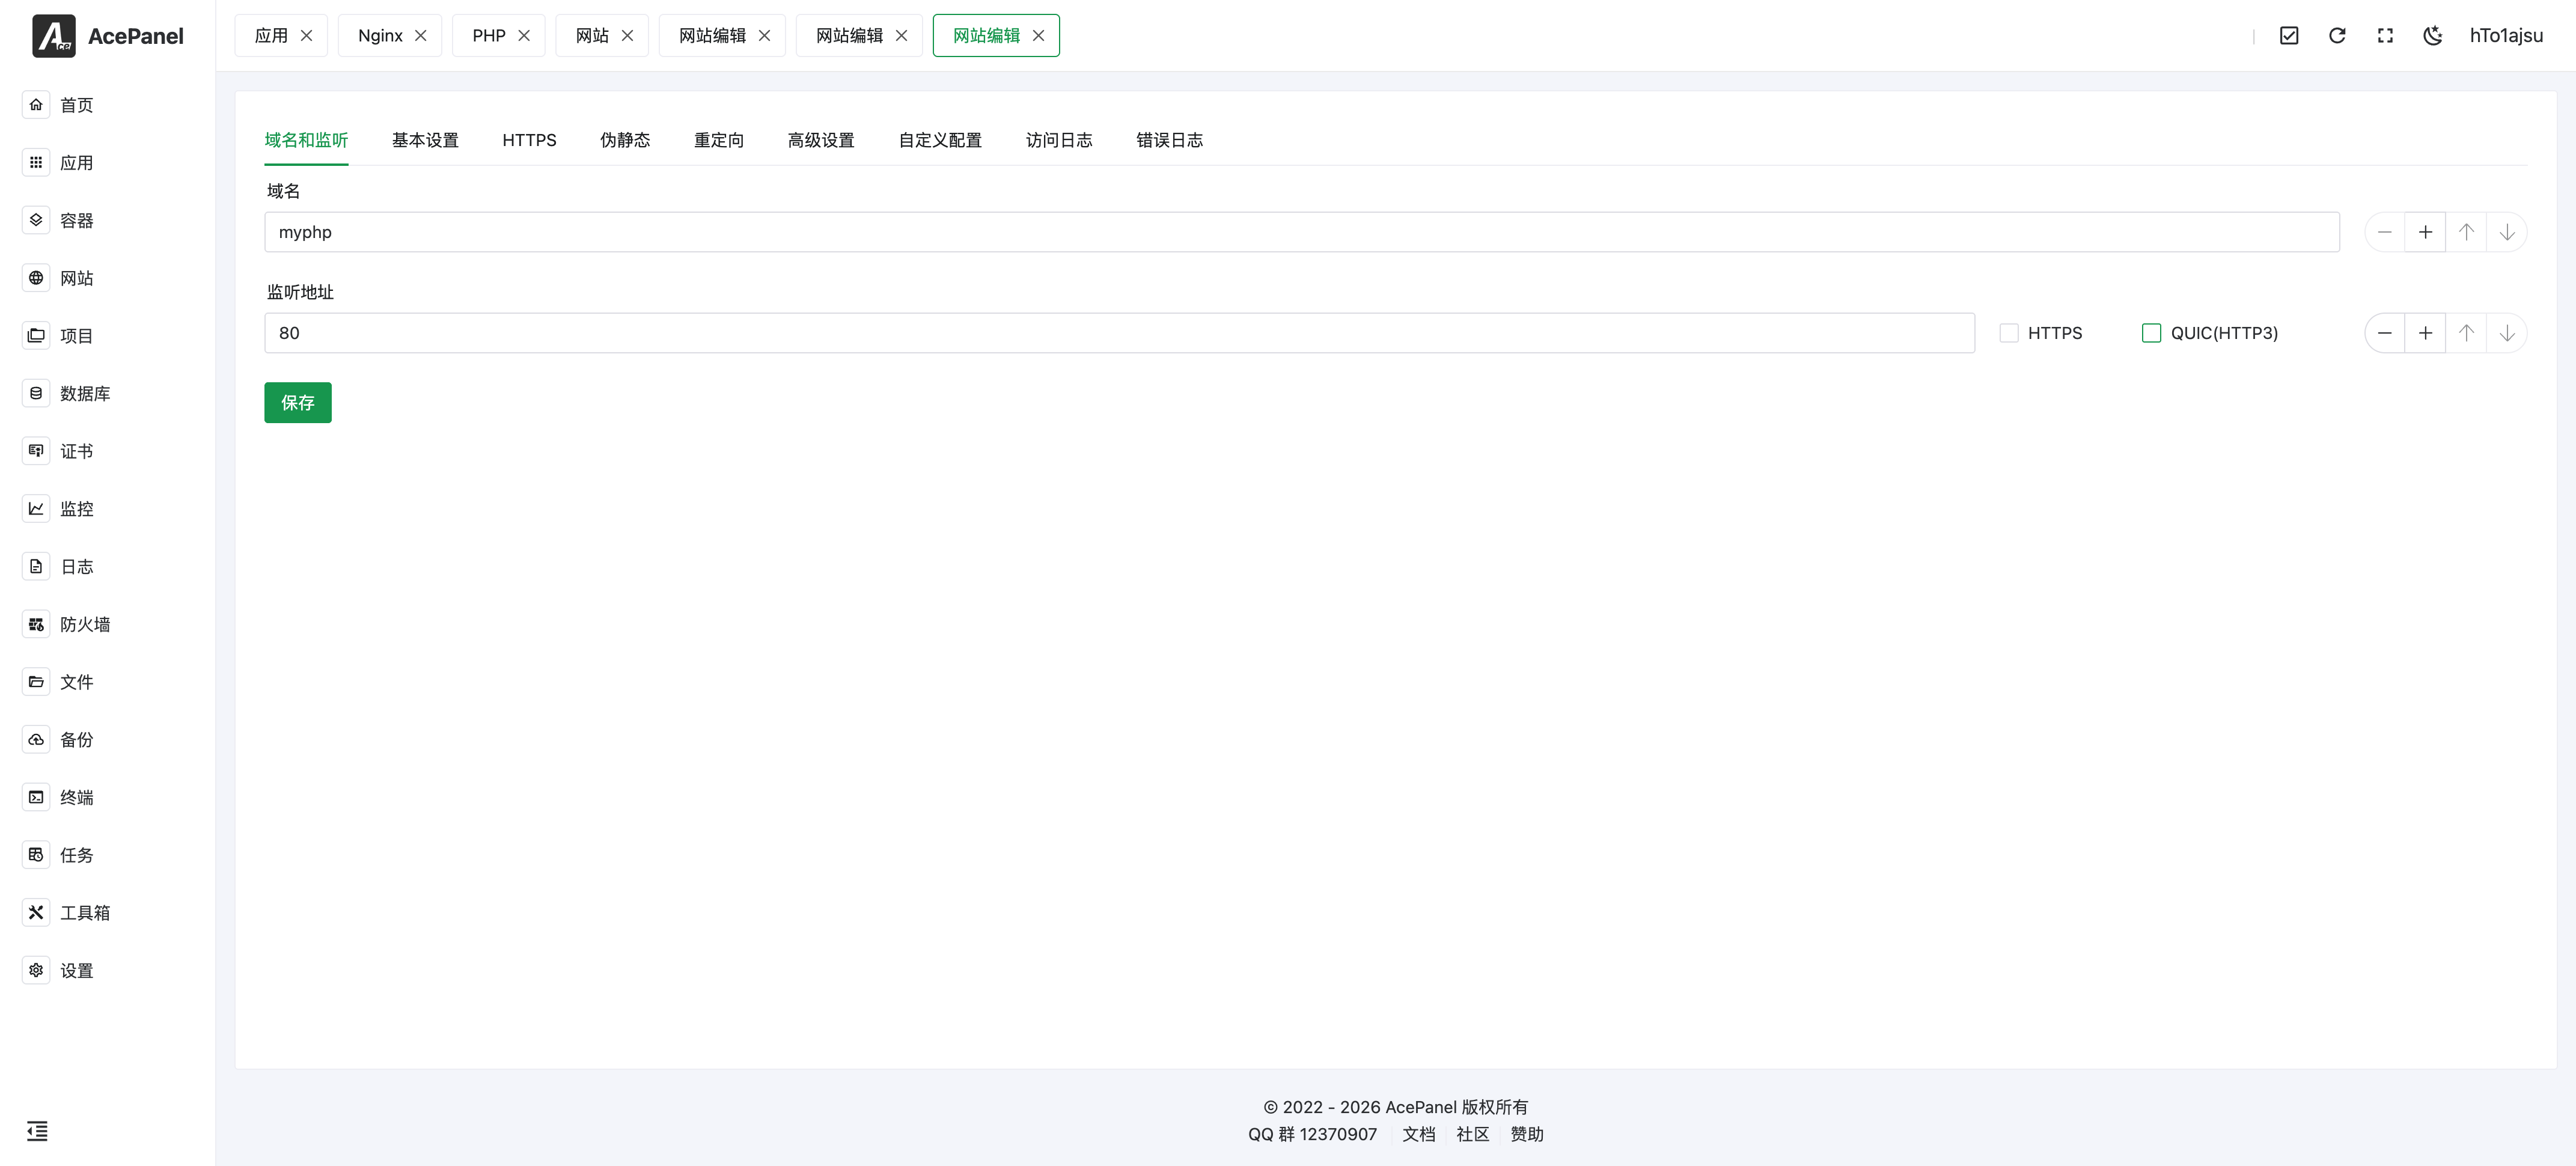
Domain and Listen
Configure the website's domain and listening port.
Basic Settings
Configure basic information such as website directory and PHP version.
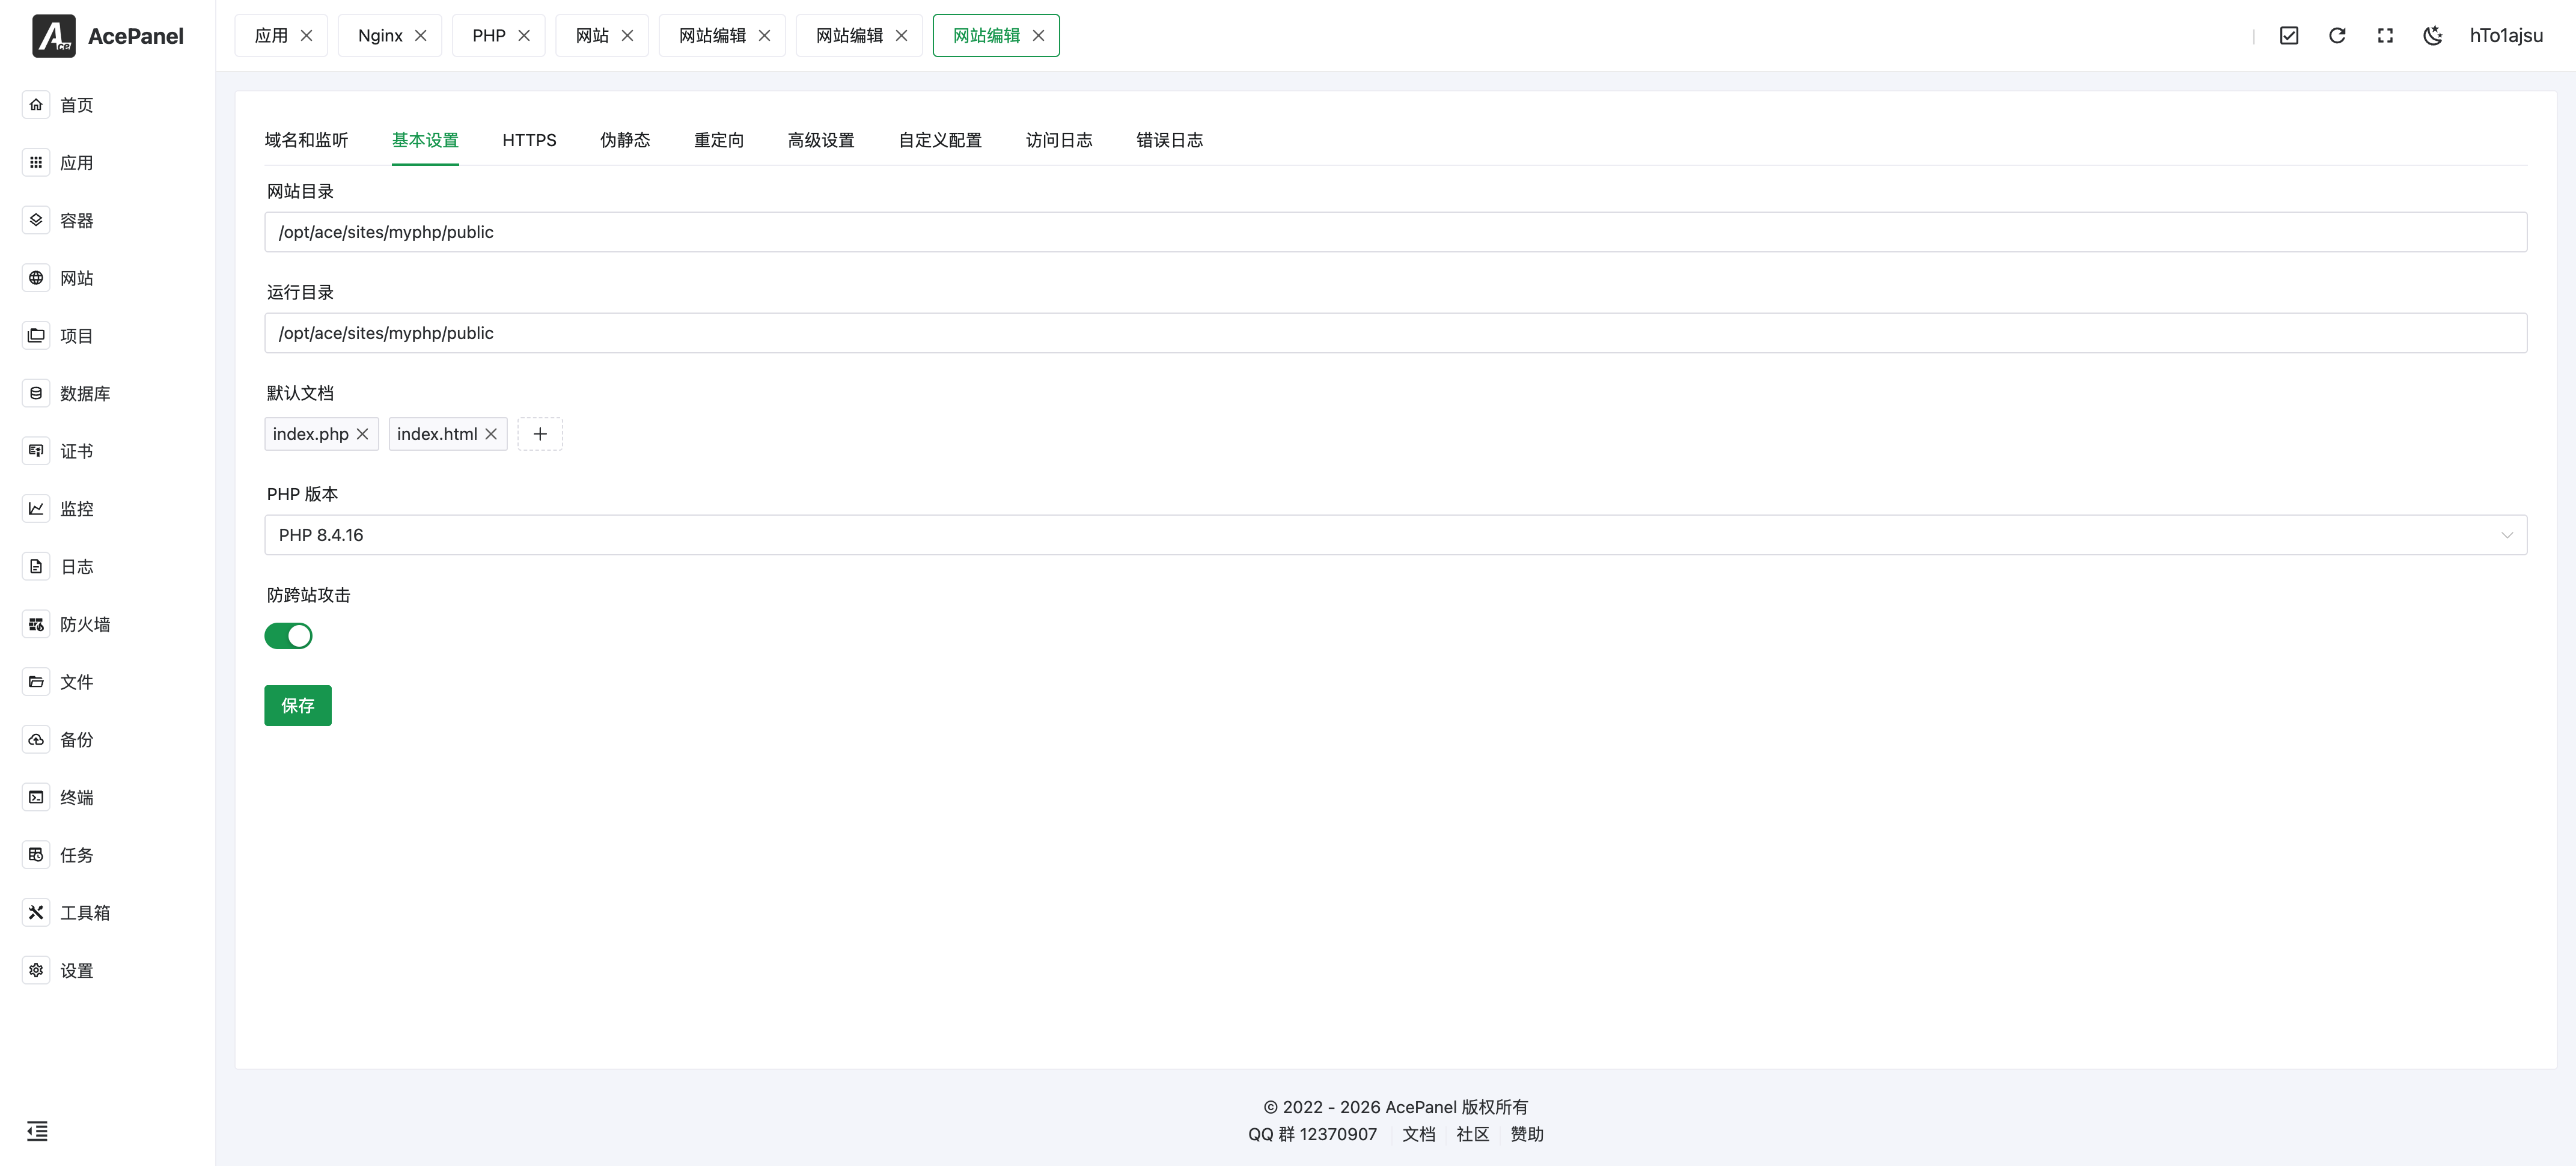
- Website Directory: Absolute path where website files are stored
- Running Directory: Frameworks like Laravel need to set the running directory
- Default Document: Default homepage file, e.g.,
index.php,index.html - PHP Version: Select an installed PHP version
- Anti-cross-site Attack: When enabled, sets
open_basedirso PHP can only access files within the website directory (and/tmp)
Rewrite Configuration
Rewrite is used for URL rewriting, supporting preset rules for common PHP programs.
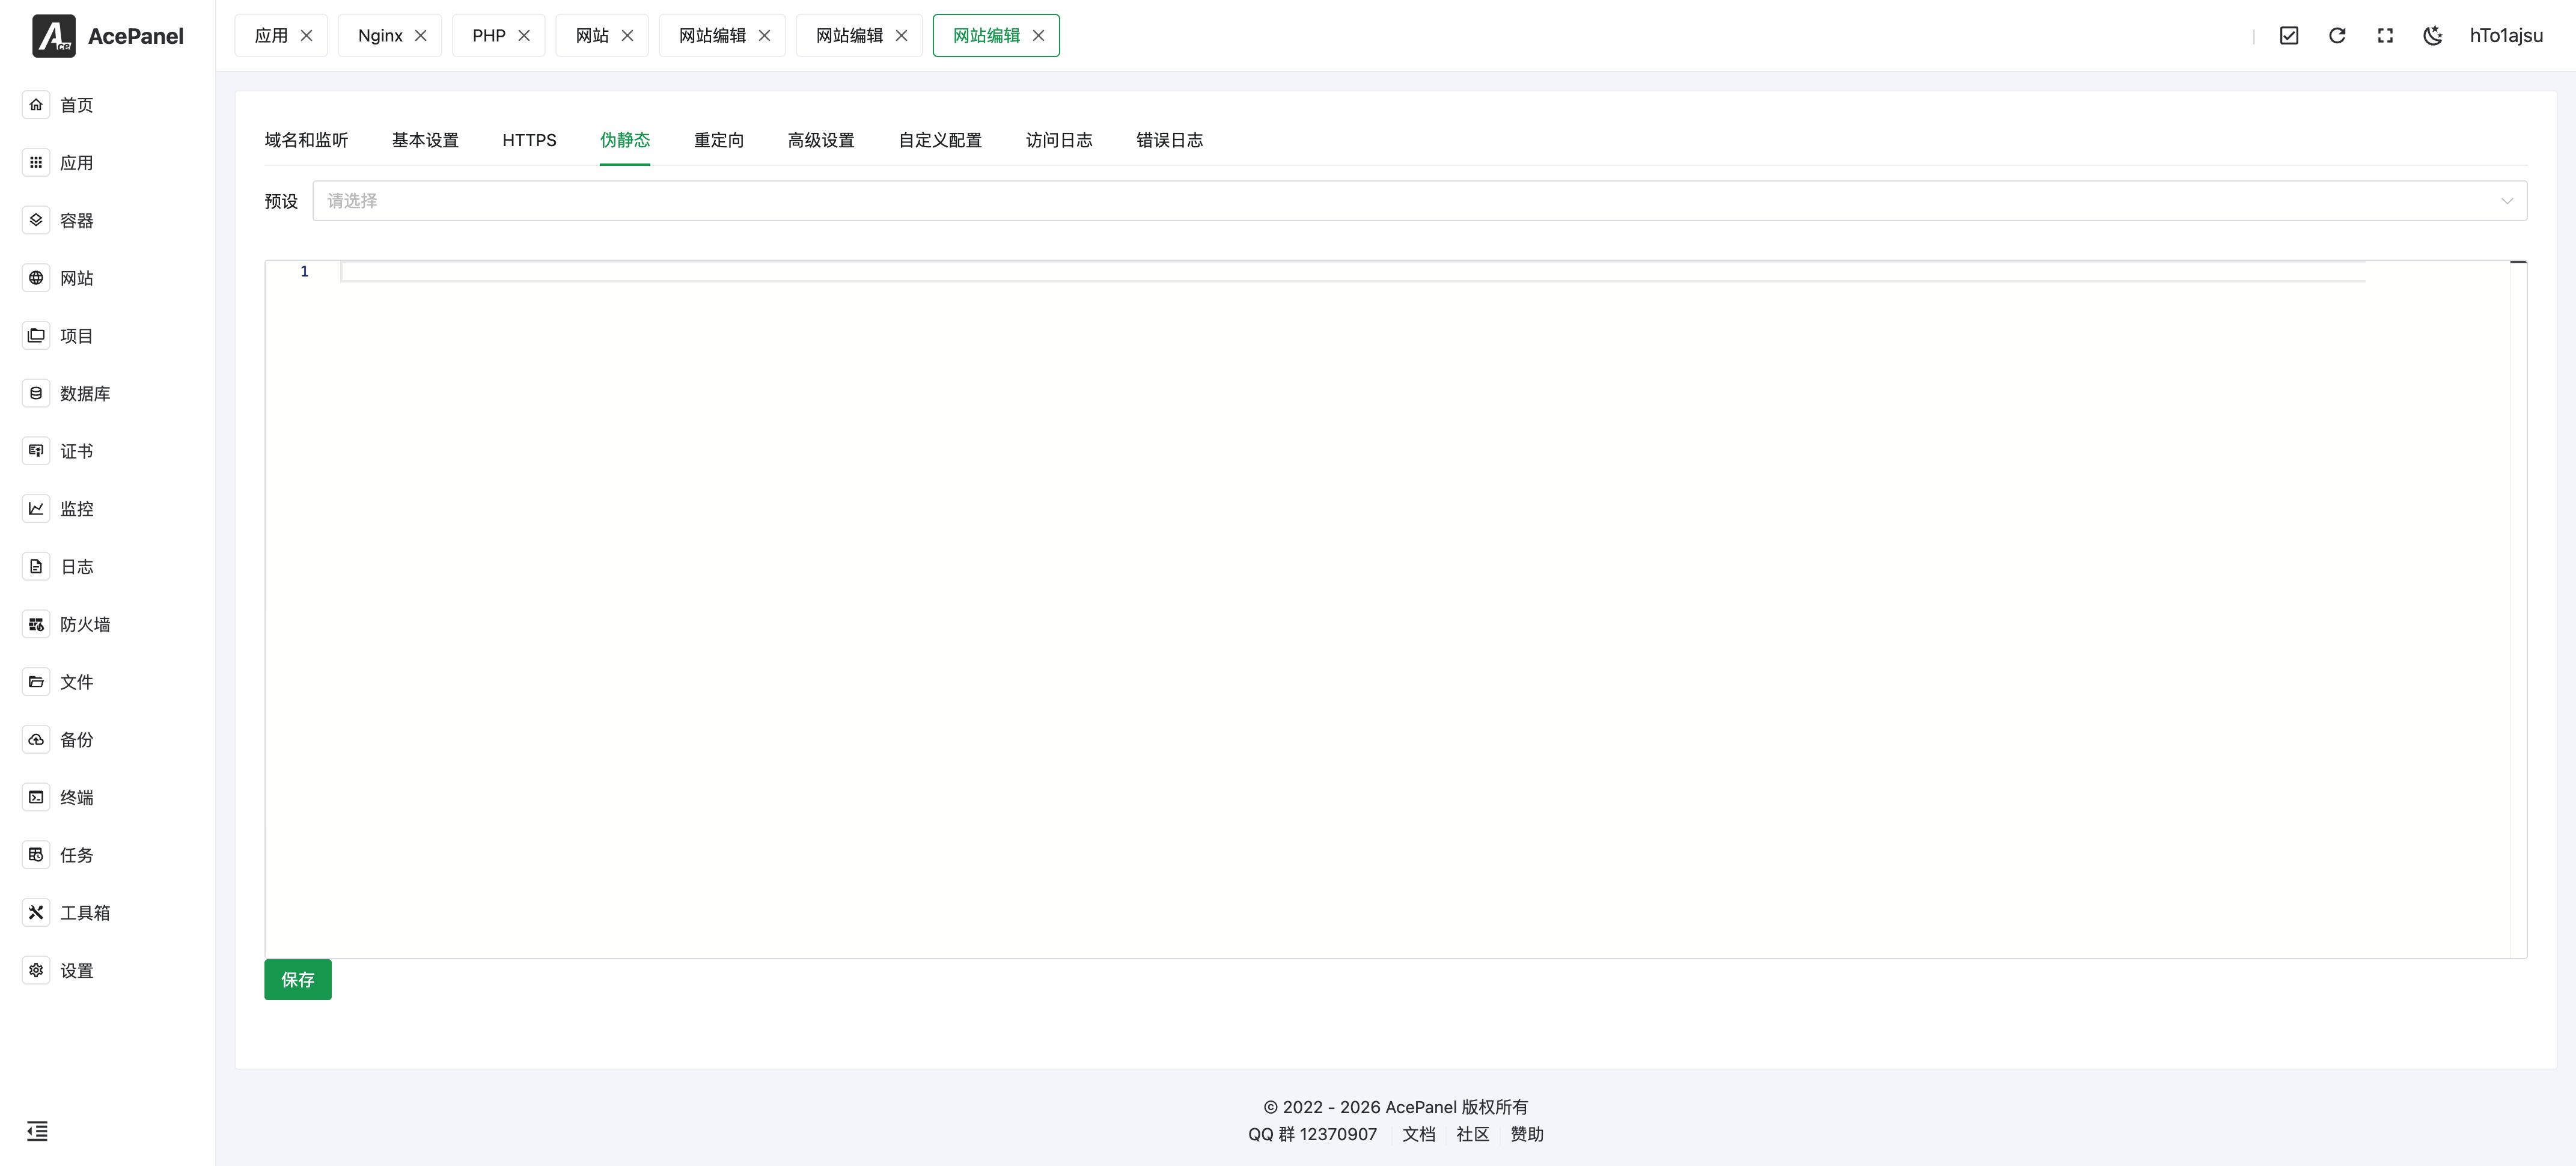
Click the preset dropdown to select rewrite rules for common programs:
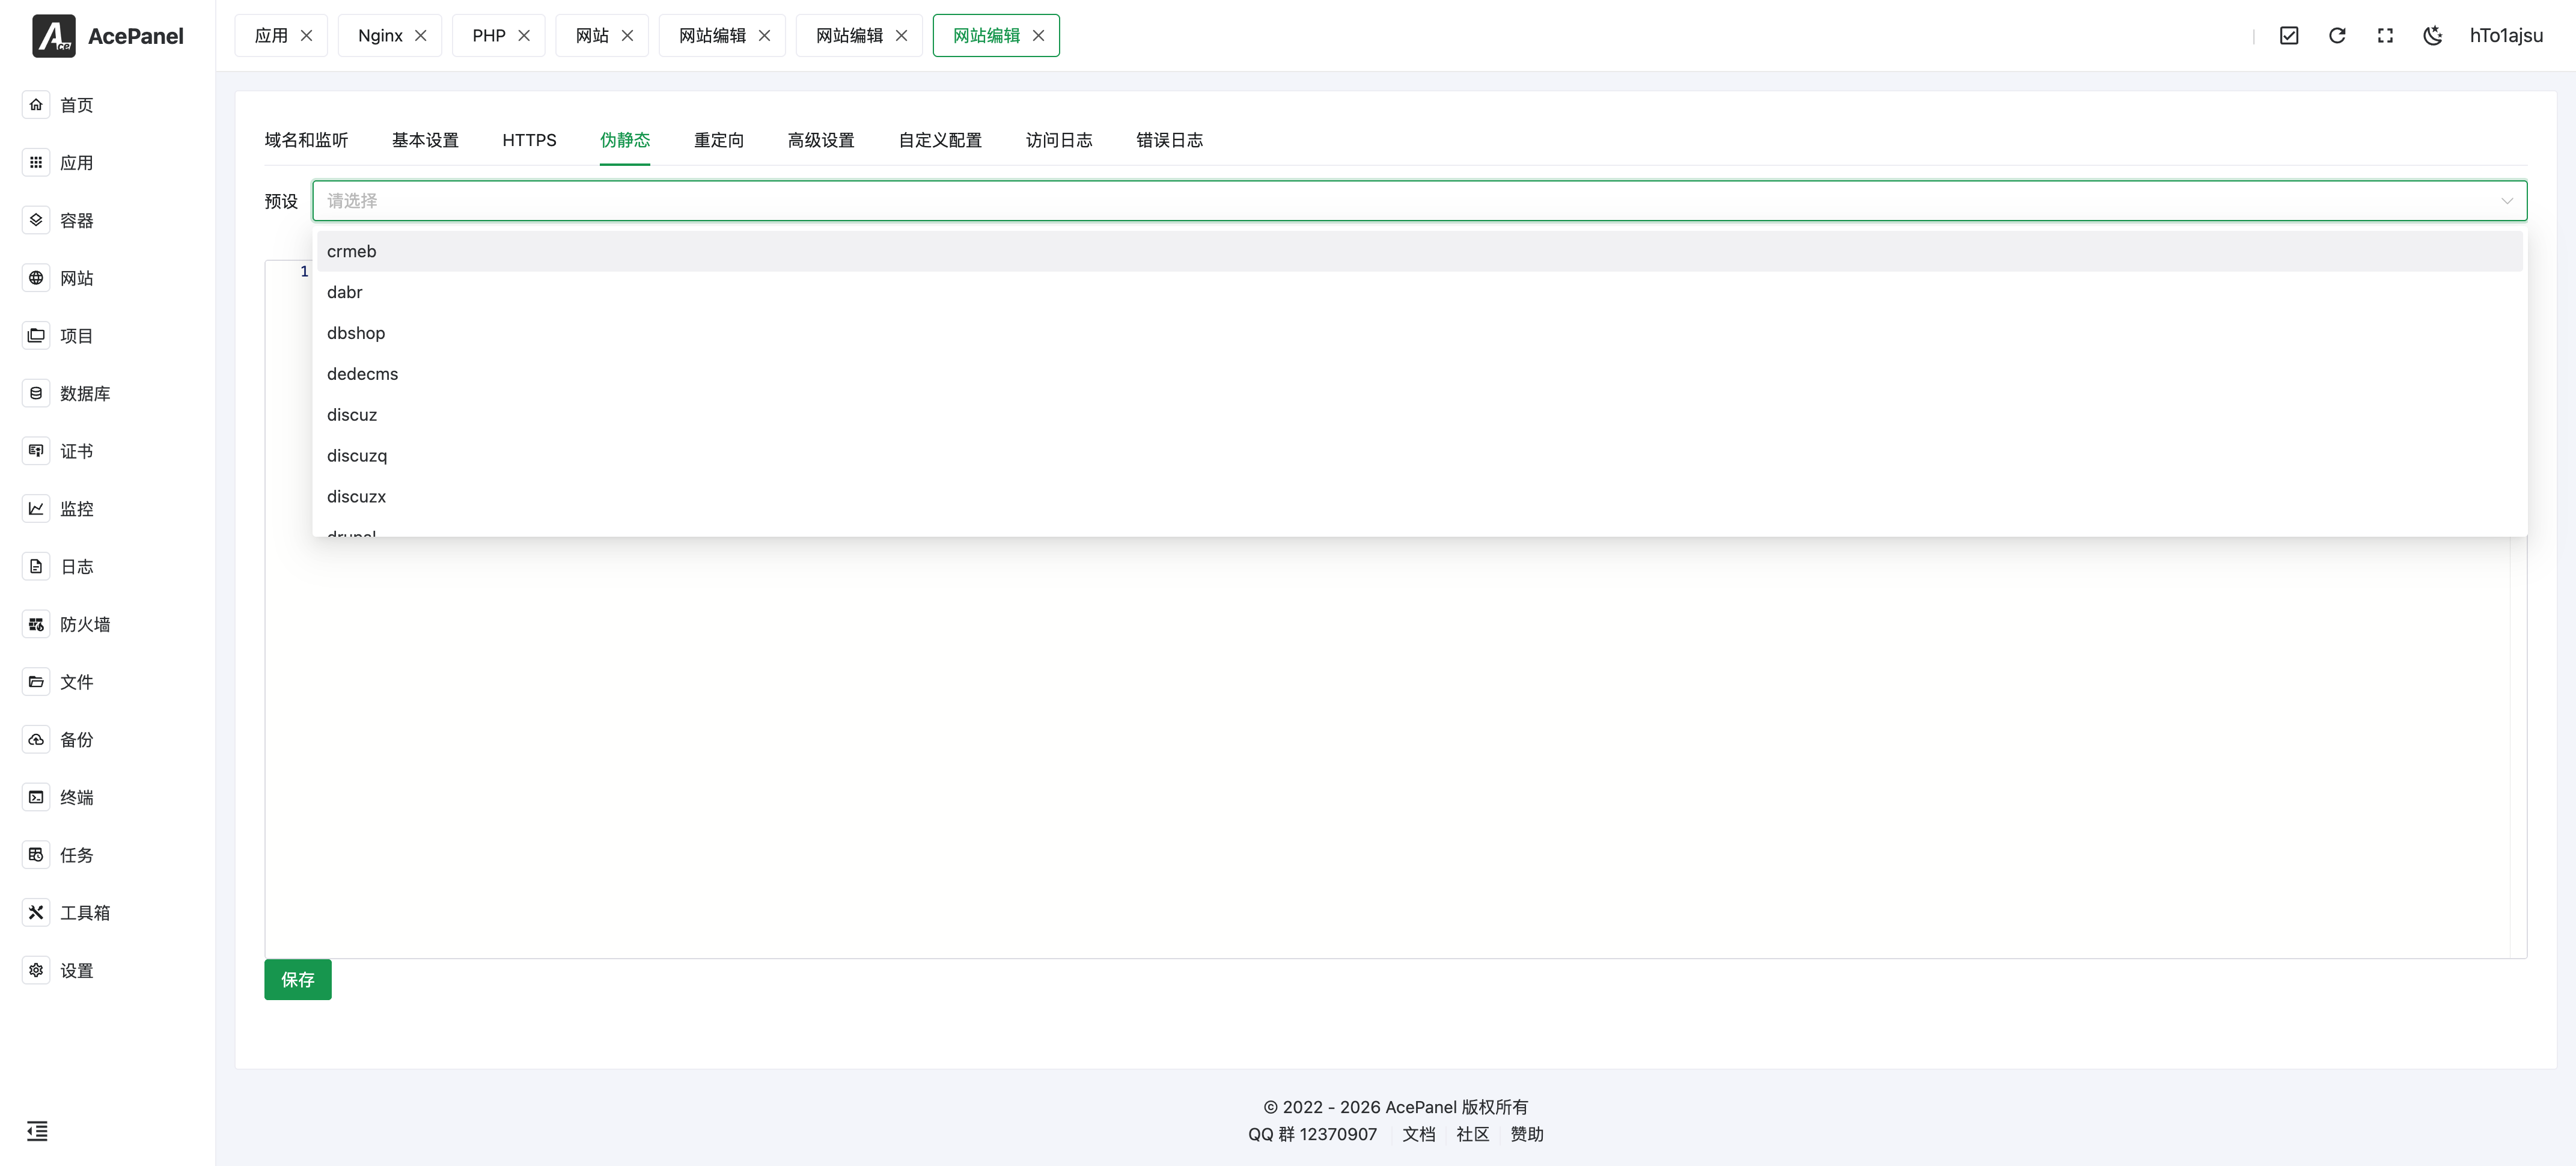
The panel ships the following 27 built-in presets:
crmeb, dabr, dbshop, dedecms, discuz, discuzq, discuzx, drupal, ecshop, edusoho, emlog, empirecms, laravel, maccms, niushop, pbootcms, phpcms, phpwind, sablog, seacms, shopex, shopwind, thinkphp, typecho, wordpress, wordpress-multisite, zblog
After selecting a preset, its rules are written into the editor below, where you can fine-tune them before saving.
Note
The preset dropdown is only shown when the web server is Nginx (presets are provided for Nginx/OpenResty only). On Apache, write rewrite rules directly in the editor.
HTTPS
Enable and configure HTTPS for the website.
- Main Switch: Enable or disable HTTPS. When enabled, the panel automatically adds a
443listen (andquicfor Nginx) - Use Existing Certificate: Pick a certificate from Certificate Management to fill in the certificate and private key automatically
- HSTS: Force browsers to access the site over HTTPS only
- HTTP Redirect: Automatically redirect HTTP requests to HTTPS
- OCSP Stapling: Enable OCSP Stapling
- TLS Version: Choose the allowed protocols among TLS 1.0 / 1.1 / 1.2 / 1.3
- Certificate / Private Key: Paste the PEM certificate and KEY private key content directly
When the website has a domain bound, the One-click Certificate Issuance button at the bottom requests a free certificate via ACME. If the domain is a wildcard (e.g. *.example.com), you will be asked to choose a DNS provider for DNS verification (add it in Certificate Management first).
Redirects
Configure redirect rules. Each rule supports:
- Redirect Type: URL Redirect, Host Redirect, or 404 Redirect
- Status Code: 301 (Moved Permanently), 302 (Found), 307 (Temporary Redirect), or 308 (Permanent Redirect)
- Source / Target: The matched path/host and the destination
- Keep URI: Keep the original request path and query parameters when redirecting
Advanced Settings
- Access Statistics (Nginx only): Toggle access statistics collection for this website
- Log Settings: Set the Access Log and Error Log paths, or set them to Disabled
- Rate Limiting: Limit Concurrent Limit (max concurrent connections for the site), Per IP Limit (max concurrent connections per IP), and Rate Limit (per-request rate in KB)
- Real IP: Configure trusted proxy IP sources (one per line) so the real visitor IP is recognized behind a CDN or Frp; choose the IP header (X-Real-IP, X-Forwarded-For, CF-Connecting-IP, etc.) and optionally enable recursive lookup
- Basic Authentication: Add username/password pairs to require HTTP basic auth before visitors can access the site
Custom Configs
Append custom web server configuration snippets. Each snippet has a Name, a Scope (This Website or Global), and a Content block edited with Nginx or Apache syntax highlighting depending on the installed web server.
Access Log / Error Log
When the corresponding log path is enabled, the Access Log and Error Log tabs stream the log file in real time. Use Clear Logs at the bottom to truncate the currently viewed log.
Note
Click Reset Configuration at the bottom of the edit dialog to regenerate the website's web server configuration from the panel template, discarding manual changes made to the generated config file.
Website Directory Structure
After creating a website, the default directory structure:
/opt/ace/sites/website-name/public
├── index.php          # Entry file
├── .user.ini          # PHP configuration
└── ...
PHP Version Switching
You can switch PHP versions in the Basic Settings of the website edit page:
- Enter the website edit page
- Click the Basic Settings tab
- Select a new version in the PHP Version dropdown
- Click Save
Note
Switching PHP versions may cause program incompatibility. Please verify in a test environment first.
PHP Management Page
Go to Applications > Operating Environment, click Manage on the installed PHP version to open the PHP management page. It provides the following tabs:
- Running Status: Shows the running state of the
php-fpm-<version>service with start/stop/restart/reload controls. Two extra actions are available here:- Set as CLI Default Version: Make this PHP version the default
phpcommand in the system CLI - View PHPInfo: Open a popup with the full
phpinfo()output for this version
- Set as CLI Default Version: Make this PHP version the default
- Module Management: Install or uninstall PHP extensions (see below)
- Parameter Tuning: Adjust common parameters through forms (see Parameter Tuning)
- Main Configuration: Edit the raw
php.inifile - FPM Configuration: Edit the raw PHP-FPM configuration file
- Load Status: View the current PHP-FPM load metrics
- Runtime Logs: Stream the
php-fpm-<version>service runtime log in real time - Error Logs: Stream the PHP error log; the Clear Log button truncates it
- Slow Logs: Stream the PHP-FPM slow log; the Clear Slow Log button truncates it
Module Management
The Module Management tab lists the supported extensions for the selected version. Each row shows the module name and description, with an Install or Delete action. Installation runs as a background task, so check progress in the background task list. Both install and uninstall require a confirmation.
Available extensions include fileinfo, OPcache, igbinary, Redis (requires igbinary), Memcached, APCu, ImageMagick, exif, pgsql / pdo_pgsql, sqlsrv / pdo_sqlsrv, imap, zip, bz2, ssh2, event, readline, snmp, ldap, enchant, pspell, calendar, gmp, xlswriter, xsl, intl, gettext, grpc, protobuf, rdkafka, xhprof, Xdebug, yaml, zstd, sysvmsg / sysvsem / sysvshm, ionCube (install after OPcache), Swoole, and Swow.
Version differences
The available list adapts to the PHP version: Swow is only offered on PHP 8.0 and above; pspell and imap are removed on PHP 8.4 and above; OPcache is no longer offered as an installable extension on PHP 8.5 and above because it is built in.
Parameter Tuning
The Parameter Tuning tab groups common settings into sub-tabs so you can adjust them without editing files by hand:
- General:
short_open_tag,date.timezone,display_errors,error_reporting - Disabled Functions: Edit the
disable_functionslist (see Disabled Functions) - Upload Limits:
upload_max_filesize,post_max_size,max_file_uploads,memory_limit - Timeout Limits:
max_execution_time,max_input_time,max_input_vars - Performance Tuning: PHP-FPM process manager settings written to
php-fpm.conf—pm,pm.max_children, and (fordynamicmode)pm.start_servers,pm.min_spare_servers,pm.max_spare_servers - Session:
session.save_handler(files,redis, ormemcached), the save path (host/port/password for redis and memcached),session.gc_maxlifetime, andsession.cookie_lifetime. The Clean Session Files button (with confirmation) deletes all session files for this version
PHP Configuration
php.ini Configuration
You can edit the raw php.ini in the Main Configuration tab of the PHP management page.
For common items, the Parameter Tuning tab provides a form to adjust them without editing the file by hand:
upload_max_filesize = 50M    # Maximum upload file size
post_max_size = 50M          # Maximum POST data size
max_execution_time = 300     # Maximum execution time
memory_limit = 256M          # Memory limit
Disabled Functions
PHP disables some dangerous functions by default, such as exec, system, passthru, etc. To enable them, edit the disable_functions value in php.ini, or adjust it from the Disabled Functions field in the Parameter Tuning tab of the PHP management page.
Warning
Enabling dangerous functions may pose security risks. Please proceed with caution.
FAQ
502 Bad Gateway
- Check if PHP-FPM is running normally
- Check if the PHP version is correctly configured
File Upload Failed
- Check
upload_max_filesizeandpost_max_sizeconfiguration - Check directory permissions
Blank Page
- Enable PHP error display
- Check PHP error logs